Tracking the source of clicks is made easier in Bing Ads by using URL parameters. Much like AdWords, adding the desired parameters to your tracking template captures information about the device type, network, match type, ad group and more.

URL tracking can be setup in 4 different ways, however, in this post we will discuss how to use the tracking template at account level.
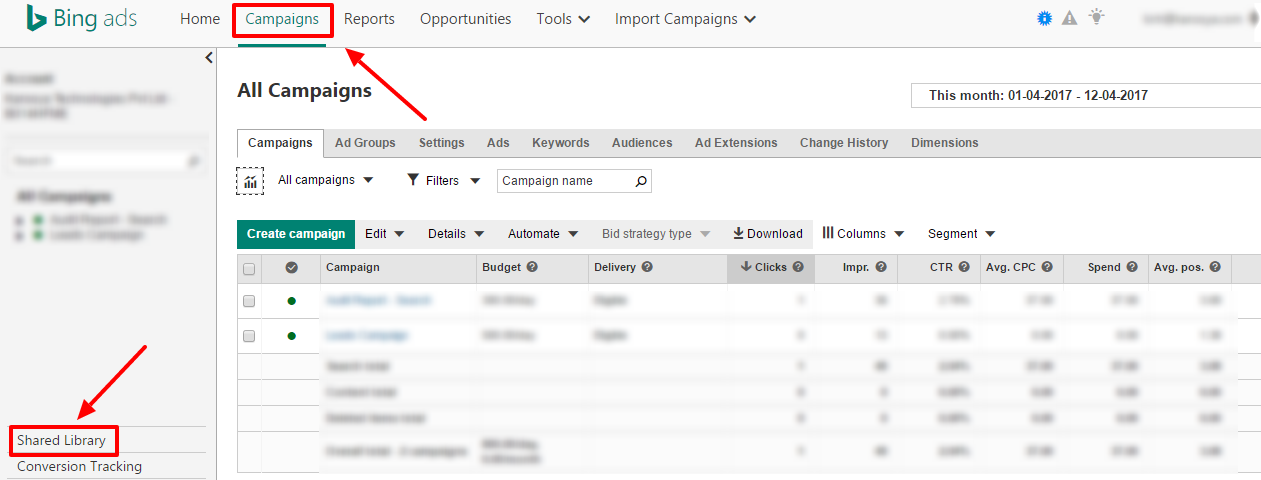
Step 1: Go to ‘Campaigns’ tab of your Bing Ads account
Step 2: Click on ‘Shared Library’ from the left menu

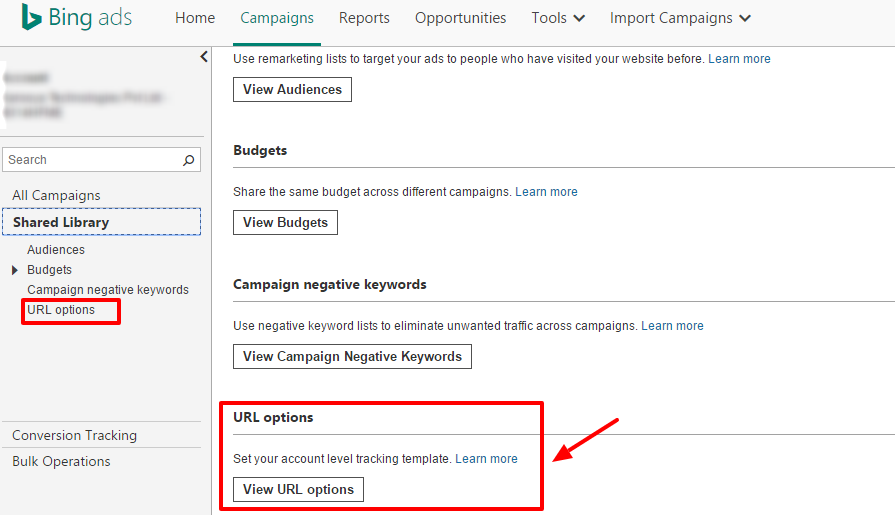
Step 3: Click on ‘View URL options’ under URL options

Step 4: You can add the tracking template in the empty field and save the settings
With these quick steps your account level tracking template is set. Henceforth, any click received on your paid ads, will track your click for the parameters defined. Unlike AdWords, Bing Ads don’t have the option to test the URL, so make sure you doubly check the tracking template being used otherwise they might return empty values.
Before you move forward and set up the tracking URL, you might want to first know what you wish to track.
Let’s have a look at some of search parameters that you could use. We ran a similar post for the search parameters in Google AdWords. It is advisable to use the same set of parameters for both your accounts as you will loose on important information that one platform captures and other doesn’t.
The basic step to set up your tracking template is to first use {lpurl}, which returns the final URL of the respective ad. It is followed with a question mark sign ‘?’ and then the name of variable and name of search parameter. If you use multiple search parameters then each are separated with an ampersand sign ‘&’
Here are certain things to track:
1. How often does your ad gets clicked from various devices?
This can be tracked with the help of {device} parameter. It helps you determine which device is generating the clicks and you can take strategic steps towards bidding more for the performing device or less for the underperforming one. You can also create new ads targeting the performing device type. The value returned for each device type is similar to AdWords, m for mobile, t for tablet and c for desktop.
2. Which search query triggered your ad?
Using {QueryString} parameter helps track the search query that your ad got displayed for and resulted in a click. It is more useful to club this parameter with the {TargetId} and the {MatchType}, each of which we will discuss in the next point.
3: Which keyword, remarketing list did your ad show for?
{TargetId} helps tracks the id of keyword (displayed as ‘kw’), remarketing list (displayed as ‘aud’) and dynamic ad target (displayed as ‘dat’) that prompted your ad to show. With this information you get insight on which are the keywords or remarketing lists that are performing and you can decide to dedicate a separate ad group to reap out its benefits. Clubbing this parameter with {Query String} parameter helps you dig deeper into which search query triggered which keyword from your ad group.
4. Which match type is generating clicks?
As much knowing which keyword and search query triggered your ad is important, so is to know which mach type delivered that click. This helps you figure out the relevancy of your match type, whether it is triggering the ad for a relevant search query or not. It being clubbed with {QueryString} will help you meet that objective.
5. Which ad is driving results?
To come up with the right messaging advertisers opt for multiple ad copies and analyze it to determine which one is generating the clicks. The parameter {AdId} returns the id of the ad creative that resulted in the click, which helps you take the decision of which ad to go ahead with.
There are other parameters that you can choose from here.
Related Links:


Stop the wasted ad spend. Get more conversions from the same ad budget.
Our customers save over $16 Million per year on Google and Amazon Ads.