Google Ads Experiments is a powerful tool that allows you to test different campaign variations without risking your entire campaign’s performance. This feature is essential for optimizing your ad campaigns and improving your ROI.
This post will guide you through the Experiments workflow within the new Google Ads interface. We’ll break down the process of setting up variations, analyzing results, and ultimately optimizing your campaigns for maximum impact – all within the streamlined layout of the new UI.
Understanding Google Ads Experiments
It’s a built-in feature within Google Ads that lets you create variations of your existing campaigns and compare their performance head-to-head. This allows you to test different elements like:
- Ad copy: Headlines, descriptions, and calls to action (CTAs)
- Targeting: Demographics, interests, keywords, and placements
- Bidding strategies: How much you’re willing to pay for clicks or conversions
- Landing pages: The webpages users reach after clicking your ad
- And more! (Depending on the experiment type)
Before diving into the process, it’s essential to understand how experiments work:
- Create an experiment: Define your hypothesis and select the campaigns you want to test.
- Make changes: Modify specific elements like ad copy, bidding strategies, or targeting options.
- Monitor performance: Track key metrics to determine the performance of your experiment.
- Apply changes: If the experiment succeeds, apply the changes to the original campaign.
Steps to Create a Google Ads Experiment
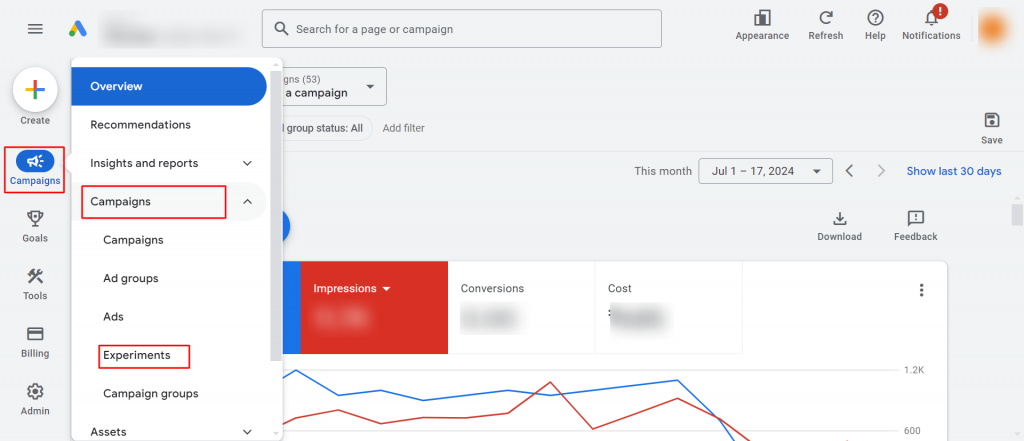
Access the Experiments Tab:
Navigate to the “Campaigns” tab in your Google Ads account and select “Experiments” from the dropdown menu.
Create a New Experiment:
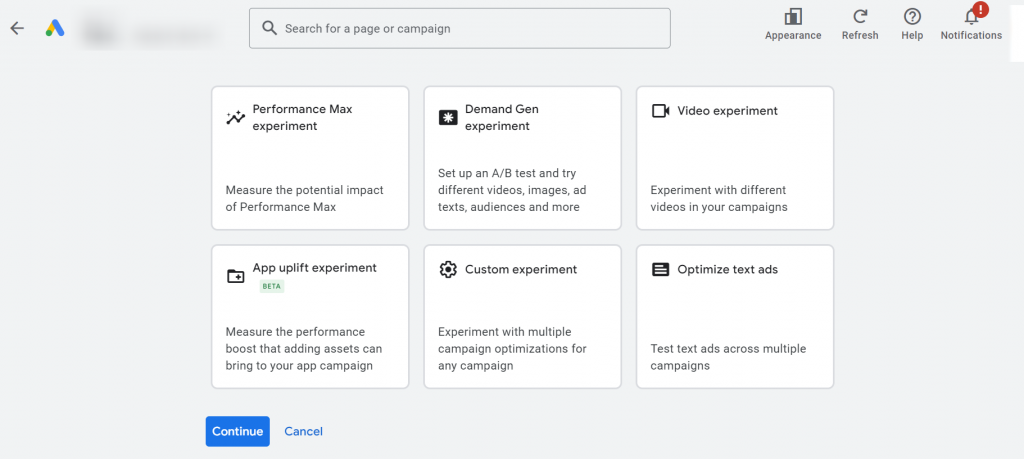
Click the plus button and choose the experiment type:
- Custom Experiment: Allows you to test almost any aspect of your campaign, including:
- Ad copy variations (headlines, descriptions, call-to-actions)
- Bidding strategies
- Targeting options (demographics, interests, keywords)
- Landing pages
- Ad extensions
- Audience segmentation
- Optimize Text Ads: It is specifically designed for testing ad copy variations. Compares multiple versions of headlines and descriptions to see which ones perform best. Easy to set up and ideal for A/B testing different ad copy elements.
- Video Experiment: For comparing different video ad creatives. It allows you to compare various video formats, lengths, and messaging to identify the most engaging ones. Beneficial for optimizing video ad campaigns for better view-through rates or conversions.
- Performance Max Experiment: Tests different variations of Google’s automated Performance Max campaigns. Limited availability as it’s currently in beta testing. Allows you to compare different settings or strategies within Performance Max campaigns.
- App Uplift Experiment: This experiment type measures the impact of adding video assets to your existing app install campaigns. It helps you understand if including video ads alongside your static creatives (text and images) significantly increases app installs.
- Demand Gen Experiment: This experiment type is specifically designed for testing elements in Google’s Demand Gen campaigns, which focus on reaching consumers on YouTube, Gmail, and Discover feeds to drive brand awareness and consideration.
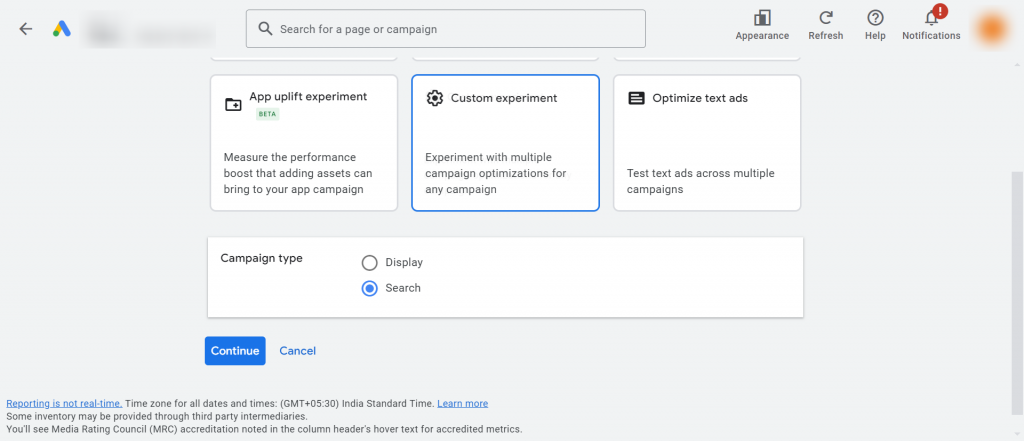
In this post, we will look into Custom Experiment
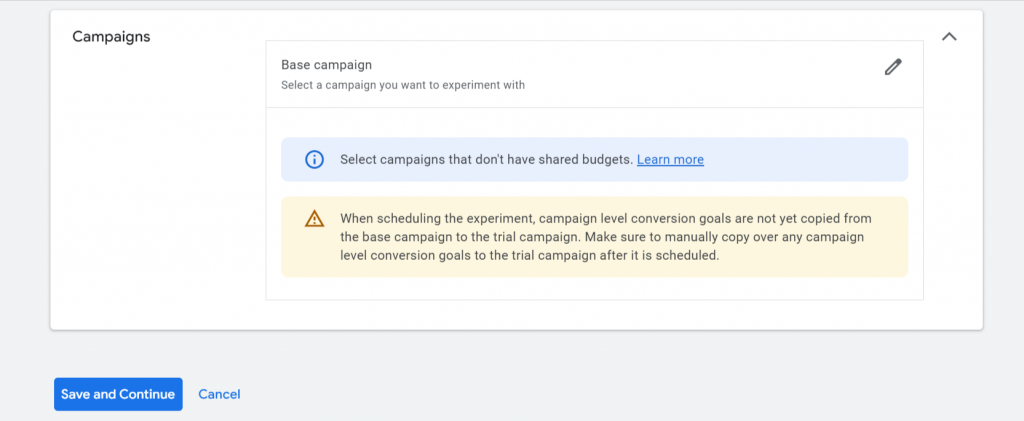
Select Campaigns:
Select the campaign type you want to create and in the next step give details of the the experiment. Choose the campaigns you want to include in the experiment.
Make Changes:
Create variations of your campaigns with different settings, ad copy, bidding strategies etc. that aligns with the objective of your experiment
Define Goals:
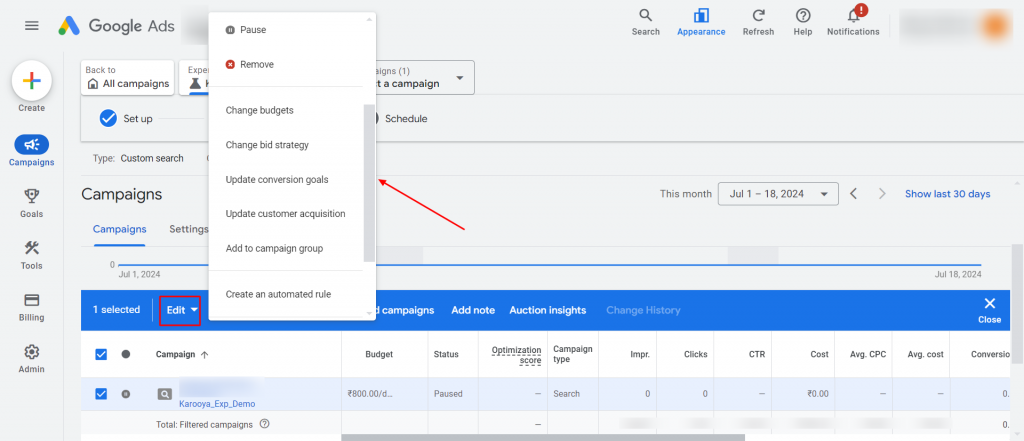
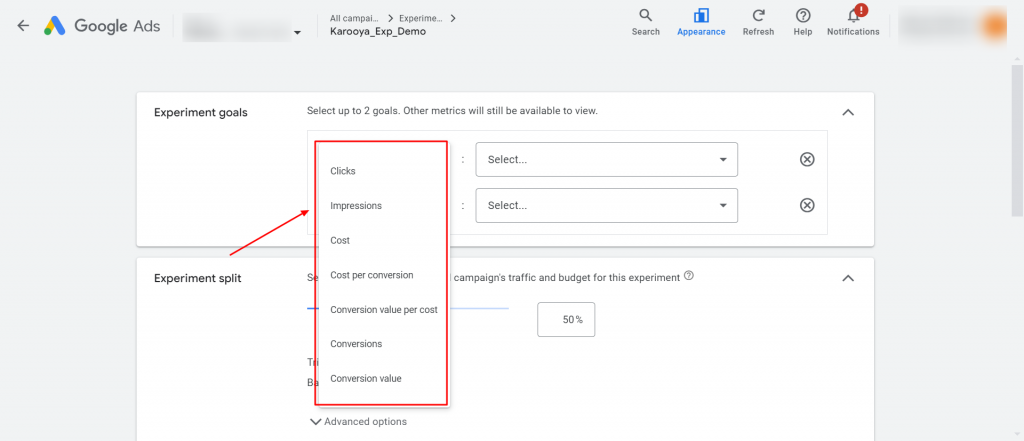
Click on schedule to save the settings you have made to the experiment. In the following step, select up to two goals to measure the success of your experiment (e.g., conversions, clicks, cost per conversion).
Choose the Experiment Split:
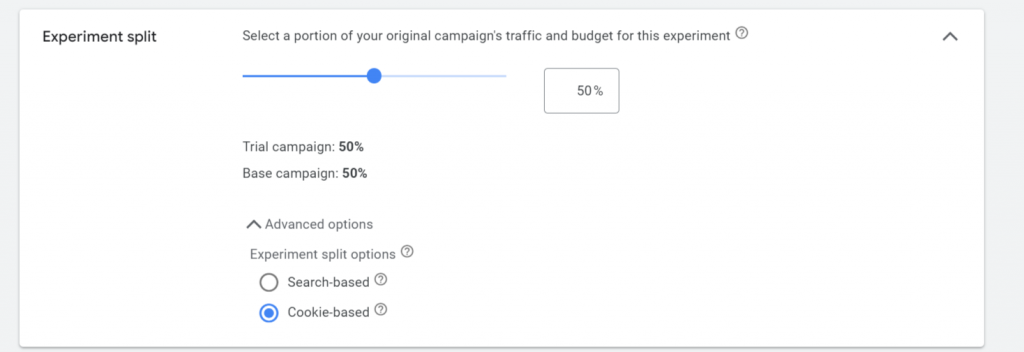
It is the percentage value that defines the traffic and budget division between your original campaign and the experiment(s) you’re creating. 50% is the default option and allocates half of the traffic and budget to the original campaign and the other half to the experiment.
You can choose a different percentage split, allowing you to allocate more or less traffic to the experiment based on your needs.
Additionally, Google Ads Experiments offer two options for splitting traffic:
- Search-based split (recommended): Dynamically allocates traffic based on real-time searches, ensuring a balanced distribution.
- Cookie-based split: Uses cookies to show the same variation (original or experiment) to a user throughout the cookie’s lifespan.
Suggested option: Search-based split is generally recommended for its flexibility and balanced traffic distribution. Use cookie-based splits cautiously if you need guaranteed user experience consistency across sessions.
Schedule Experiment:
Set the start and end dates for your experiment.

Managing changes with Enable Sync:
In the next step, choose the option to enable sync or not. “Enable Sync” in Google Ads Experiments automatically applies changes made to your original campaign (keywords, bids, ad copy) to the experiment variation too. This saves time and keeps things consistent for a fairer comparison. Use it most of the time. Only disable it if you want to test a specific change in isolation within the experiment.
Monitor Performance:
Regularly review the experiment’s performance to identify trends and insights.
Apply Changes:
If the experiment is successful, apply the changes to the original campaign.
With Google Ads constantly evolving, staying updated on the latest features like the new UI for Experiments can give you a significant edge. By leveraging experiment variations and data analysis, you can optimize your campaigns for better performance. Keep exploring the new interface and experimenting to unlock the full potential of Google Ads!
Related Links:





Stop the wasted ad spend. Get more conversions from the same ad budget.
Our customers save over $16 Million per year on Google and Amazon Ads.